
Why Rough Opening Flashing Fails…. and How to Fix It

The Anatomy of a Window Leak:
When water stains appear on interior drywall or drops begin dripping from the top of an interior casing after a nor’easter, the first instinct for most homeowners (and many builders) is to blame the window manufacturer.
The glass seal must have blown, the mitered frame joints must have parted, or the factory gasket must be defective.
Yet when you tear back the exterior trim and expose the rough opening, nine times out of ten, the window unit itself performed exactly as designed. The failure happened in the framing pocket.
Modern high-performance windows are engineered to manage water, but they rely entirely on the continuous integrity of the rough opening (RO) flashing to direct incidental moisture back out to the drainage plane. When rough opening detailing breaks down, water doesn’t just wet the sill… it rots king studs, saturates insulation cavities, and destabilizes the subfloor.
Here is an engineering breakdown of why rough opening flashing details fail, the physics of water intrusion around window openings, and the exact field practices required to keep framing dry for the life of the building.
Violating the Shingle-Fashion Rule: The Hazard of Reverse Laps
The foundational law of exterior moisture management is simple: gravity rules, and upper layers must always lap over lower layers (shingle-fashion).
Despite this fundamental principle, reverse laps remain one of the most common site errors in residential and light commercial construction:
- The Mechanism of Failure: When an installer applies jamb flashing tape over the top of the head flashing, or tapes the bottom nailing fin directly over the housewrap without a drainage path, they create an upward-facing seam. As wind-driven rain tracks down behind the siding or veneer, it hits that microscopic horizontal lip. Capillary action and hydrostatic pressure push the water behind the tape, channeling runoff directly into the OSB sheathing and framing studs.
- The Correct Sequence:
- Prepare the sill first (extending out over the building wrap below).
- Install the window plumb and level.
- Apply side jamb flashing tape over the side nailing fins, extending past the sill flashing.
- Apply head flashing tape directly over the top nailing fin and onto the bare sheathing.
- Lap the building wrap (WRB) down over the head flashing tape, sealing the diagonal apron cuts with approved seam tape.
Every transition must ensure that water running downward meets an outward-sloping shed, never a seam edge.
The Flat Sub-Sill Trap: Why Corners Always Rot First
Look at any 15-year-old window frame pulled during a remodel, and the damage is rarely across the middle of the header. It is almost exclusively concentrated in the bottom rough opening corners.
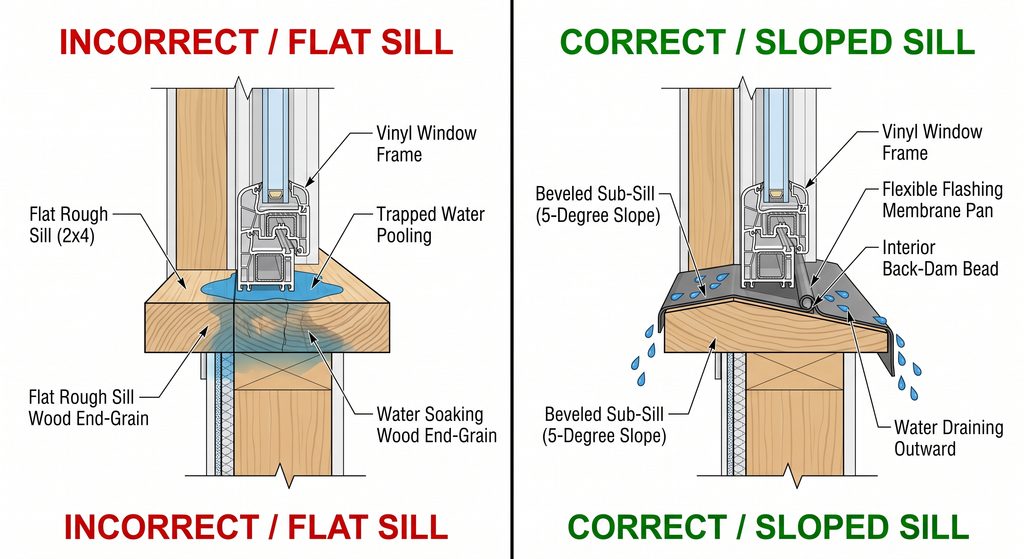
When water breaches the exterior perimeter seal (whether through driving winds, sealant fatigue, or thermal expansion at the frame joints) it follows gravity down the jambs to the sill. If the rough opening framing is dead-level flat, that water has nowhere to go. It pools against the bottom corners of the framing buck, where capillary action pulls it into the end-grain of the trimmers and jacks.

The Fix: Build a Positive Slope
Never install a window onto a flat 2×4 or 2×6 framing plate. Always create a positive drainage slope (roughly 5 degrees, or at least 1/4″ fall from back to front) toward the exterior:
- Beveled Siding Strip: The fastest field method is cutting a strip of cedar or composite bevel siding to the width of the rough opening and tacking it thin-edge-out onto the rough sill before flashing.
- Tapered Sill Plates: Mill or rip a dedicated sloped sub-sill buck on heavy commercial openings.
- Back-Dam Integration: Install a 3/8″ to 1/2″ back dam (a wood stop or specialized composite bead) along the interior edge of the sill before applying the flashing membrane. This mechanical stop prevents any wind-driven moisture that penetrates the sill from ever spilling inward toward interior floors.
Sill Pan Assemblies: Liquid-Applied Membranes vs. Self-Adhering Tape
A sloped sill requires a continuous, puncture-resistant, waterproof pan to catch and evacuate moisture. The two predominant modern approaches are peel-and-stick membranes and fluid-applied flashing. Both work exceptionally well, but each carries specific installation liabilities.

The Peel-and-Stick Vulnerability: Corner “Tenting”
When using flexible, self-adhering sill membranes (like butyl or modified bitumen tapes), the primary installation failure is stretching the material tightly into the 90-degree corner where the sill meets the jamb trimmer.
Over time, the tape’s elastic memory causes it to pull back toward its original shape, creating a hollow bridge (“tenting”) across the corner. When fasteners or window installation shims are driven down into that corner, they puncture the suspended membrane, creating an immediate leak pathway right into the structural framing.
If using peel-and-stick:
- Use dedicated flexible sill tape engineered to conform to three-dimensional corner transitions without cutting.
- Install pre-formed corner corner-patches or prefabricated plastic corner boots beneath the tape at all sill-to-jamb junctions.
- Hand-roll the membrane with a J-roller to activate the pressure-sensitive adhesive fully.
The Liquid-Applied Advantage
Modern fluid-applied flashing (STPE or polyether-based) has rapidly become the standard on high-performance jobsites. Because it is gunned on and spread with a trowel or putty knife, it forms an elastomeric, monolithic barrier with zero seams, zero fish-mouths, and zero corner transitions to detail. It bonds aggressively to damp OSB, plywood, CMU, and treated lumber, fully sealing irregular substrate gaps that peel-and-stick membranes bridge over.
The Deadly Mistake: Caulking the Bottom Nailing Fin Shut
Perhaps the most widespread mistake on residential jobsites is the bead of sealant run across the bottom exterior nailing fin.
It seems intuitive to an untrained installer: if caulk stops water, caulking all four sides of the window must make it four times safer.
Never seal the bottom exterior nailing fin.
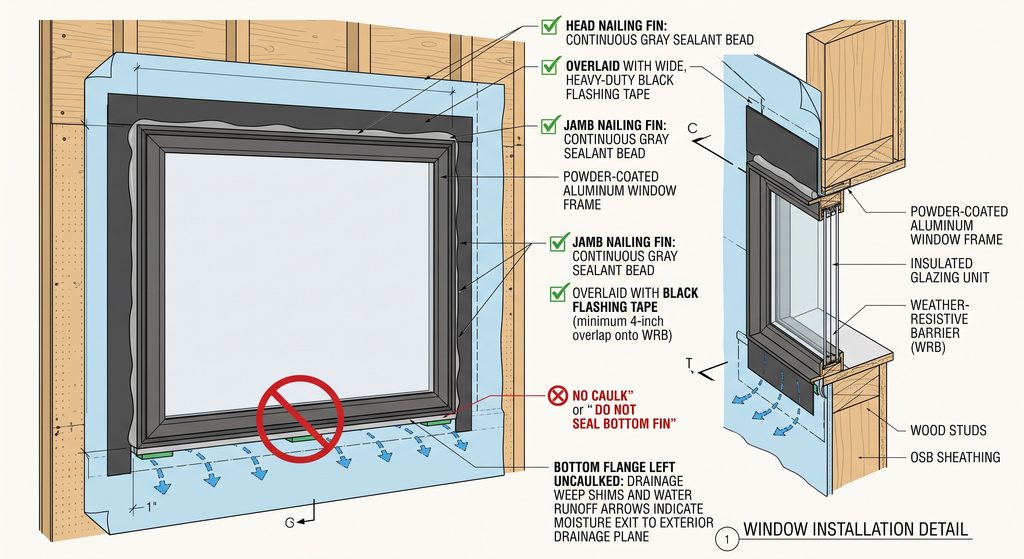
Windows are designed on the reality that some amount of incidental moisture will bypass the exterior sash perimeter over decades of wind, driving rain, and thermal cycles. That moisture drains down through internal frame channels to the sloped sill pan below.
- If the bottom exterior nailing flange is caulked solidly against the sheathing, the drainage exit is sealed shut.
- Water entering the window frame has no path out to the drainage plane.
- As the water level rises inside the sill pan, it eventually overcomes the interior back dam, flooding across the subfloor and down through ceiling framing below.
The Golden Rule: Bed the top and side nailing fins in heavy beads of elastomeric sealant (or seal them over the exterior face with approved flashing tape), but leave the bottom fin completely open to weep. Use intermittent shims behind the bottom fin if necessary to maintain an unobstructed capillary drainage break.
Precision Products for Watertight Envelopes
A high-performance window is only as resilient as the materials backing it up. Achieving an airtight, watertight installation that satisfies current IECC energy codes and survives Northeast weather demands commercial-grade barriers, compatible sealants, and precision-engineered flashing membranes.
Stocking your jobsite with professional-grade flashing systems, hybrid fluid-applied membranes, and premium window lines ensures zero callbacks when the heavy weather rolls in.